Robots / Robots System Wide
The Robot Management summarizes all tasks from a Robot's perspective. Users may deploy and release Schedules, start and stop a Robot's Scheduler, configure Robots, grant and revoke licenses etc. All these options are callable either via toolbar or the context menu opened by right-clicking Robots. Several toolbar buttons or context menu entries are disabled by default, but enabled after at least one Robot has been selected.
Control Center's multitenancy implies that Robots are assigned to a specific Customer. Systems users are able to assign Robots to a Customer and vice versa. Within the Robot Management's overview, logged-in standard users view Robots of their assigned Customers only; whereas System Users only view Robots of the Customer currently selected by the Customer Switch.
The overview of Robots System Wide is only available to System Users and shows all Robots for every Customer. With a few exceptions, the icon bars and context menu items are the same as in a single Customer's overview of Robots.

The left section of the Robot Management view shows the Control Center's sub menus with the current view marked as selected. The middle section / main view contains a table listing all Robots beside a subset of their properties. This list of Robots supports multi-selection. If only one Robot is selected, the right section shows Robot details listing all properties of the Robot selected.
The table Robots System Wide of Customer [System] shows Robots of all types and of all Customers.
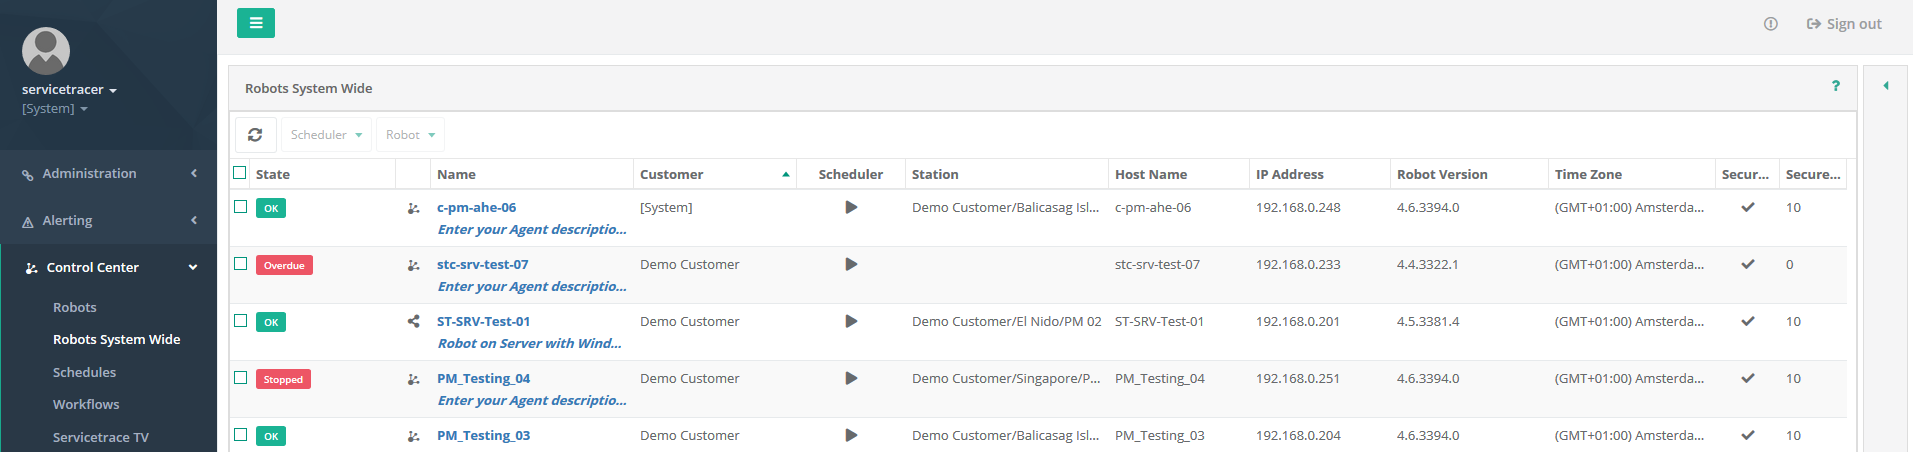
The lower section of the Robot Management shows several tabs containing Robot related information. These tabs are refreshable only, if at least one Robot is selected.
Multitenancy
Due to Control Center's multitenancy, two Robot types exist: standard Robots and System Robots. Standard Robots are managed by standard users and System Robots are managed by System Users. Therefore, if a standard user is logged in, the Robot Management shows Robots of the logged-in user's Customer only; whereas if a System User is logged in, the Robot Management shows Robots of the Customer currently specified by Customer Switch. Robots assigned to the system context [System] are called System Robots and may be managed by System Users only.
Master Data - Station
Each standard Robot and each System Robot must refer to a Station (specified within the web application Master Data) to Schedule and execute Workflows of the same Customer (tenant). If a Robot does not refer to a Station, no Schedules will be deployed to this Robot and thus no Workflow will be executed. This applies to System Robots also.
As described here, System Robots play a special role when it comes to Workflow execution. Within a System Schedule, both System Workflows (i.e. Workflows of the system Customer) and Customer Workflows may be deployed to a System Robot. Thus a System Robot is able to execute Customer Workflows as well. Because a Robot or a System Robot require a Station reference to execute Workflows, a System Robot may refer to one System Station and several Customer Stations simultaneously. Note: A System Robot is able to execute Customer Workflows only, if it refers to the respective Customer's Station.
Menu
This view's toolbar and context menu differ according to the type of logged-in user. Standard logged-in users need to own privileges to access several menu items. If standard logged-in users do not own the privileges required, respective menu items will not be shown in the toolbar or context menu. In a System User login context menus vary depending on the Customer currently selected by Customer Switch. The differences are explained by the respective menu item.
 Refresh
User/System User
Clicking Refresh refreshes the list of Robots. The table's
status bar shows a time stamp of the last refresh.
Deployment Deploy Workflow
User
To enable this menu item and perform a Workflow deployment, at least one Robot
has to be selected. Clicking Deploy Workflow opens a wizard guiding users through the process of deploying
Workflows to Robots selected. The Workflow deployment will be automatically scheduled as a task for the respective
Robots; thus the deployment process may take some time. Users may view the task's state within the Robot
Management's Tasks tab.
To perform this operation, standard users must own the privileges Schedules Create / Edit and Schedules Deploy.
System User
In a System User context the deployment of Workflows is carried out as
in a standard user context. The automatically created Schedule operates in the context of the Customer currently specified
by Customer Switch. If [System] is selected by Customer Switch, System Schedules can be created. System
Schedules may contain Workflows of different Customers.
Deployment Deploy Schedule
User/System User
To enable this menu item and perform a Schedule deployment, at
least one respective Robot has to be selected first. Clicking Deploy Schedule opens a wizard guiding users
through the process of deploying Schedules to Robots selected. The Schedule deployment will be automatically scheduled
as a task for the respective Robot; thus the deployment process may take some time. Users may view the task's state
within the Robot Management's Tasks tab.
To perform this operation, standard users must own the
privilege Schedules Deploy.
Deployment Release Schedule
User/System User
To enable this menu item and perform a Schedule release, at least
one respective Robot has to be selected first. Clicking Release Schedule opens a wizard guiding users through the
process of releasing deployed Schedules from Robots selected. The Schedule release will be automatically scheduled as a
task for the respective Robot; thus the release process may take some time. Users may view the task's state within the Robot
Management's Tasks tab.
To perform this operation, standard users must own the privilege Robot Edit.
Scheduler Start Scheduler
User/System User
To enable this menu item and perform a Scheduler's start, at least
one respective Robot has to be selected. Clicking Start Scheduler opens a message box for Scheduler's start
confirmation. The Robot Scheduler processes all deployed Schedules at once. Therefore, if the Robot Scheduler is
stopped, no Schedule will be processed. Each Schedule specifies its own time-based scheduling. The Scheduler's start
will be automatically scheduled as a task for the respective Robot; thus the Scheduler's start process may take some
time. Users may view the task's state within the Robot Management's Tasks tab.
To perform this
operation, standard users must own the privilege Robots Administration.
Scheduler Stop Scheduler
User/System User
To enable this menu item and perform the Scheduler's stop, at
least one Robot has to be selected. Clicking Stop Scheduler opens a message box for Scheduler's stop
confirmation. The Robot Scheduler processes all deployed Schedules at once. Thus, if the Robot Scheduler is stopped, no
Schedule will be processed. Each Schedule specifies its own time-based scheduling. The Scheduler's stop will be
automatically scheduled as a task for the respective Robot; thus the Scheduler's stop process may take some time. Users
may view the task's state within the Robot Management's Tasks tab.
To perform this operation, standard
users must own the privilege Robots Administration.
Robot Station Assign Station
User/System User
To enable this menu item and perform the assignment, at least one
Robot has to be selected. Clicking Assign Station opens a wizard guiding users through the assignment of Stations
to Robots selected. To perform this operation, standard users must own the privilege Robots
Administration.
Robot Station Release Station
User/System User
To enable this menu item and perform the release, the respective
Robot has to be selected first. After selecting this menu item, a wizard will guide the user through the release of
Stations from the selected Robots. The menu item is enabled, if only one Robot is selected. To perform this operation a
standard user must own the privilege Robots Administration.
Robot Rename
User/System User
To enable this menu item and perform a Robot's renaming, at least
one Robot has to be selected. Clicking Rename shows a dialogue for the specification of a new name. Besides
specifying a new name, users may change the Robot's description here. To perform this operation, standard users must own
the privilege Robots Administration.
Robot Configure
User/System User
To enable this menu item and perform a Robot's configuration, at
least one Robot has to be selected. Clicking Configure opens another view to perform the configuration (see here for a detailed description). To perform this operation, standard users must own the
privilege Robots Administration .
Robot Change Type
User/System User
To enable this menu item and change an Robot's type, at
least one Robot has to be selected. Clicking Change Type opens a window in which you can choose the Robot's type.
A robot can only be of one single type. The type of the Robot is indicated by a symbol in the Robots table. Depending on
this Robot Type, the Robot is available in different web applications. Robots of type End-to-End ![]() are used to perform end-to-end-Measurements and gather data
for the creation of Service Reports. All Robots already contained in the System before version 4.3 are initially of this
type. Robots of type Test Automation
are used to perform end-to-end-Measurements and gather data
for the creation of Service Reports. All Robots already contained in the System before version 4.3 are initially of this
type. Robots of type Test Automation ![]() are
used with the web application of the same name, which is available since Central Server® 4.3. Robots of type
Shared
are
used with the web application of the same name, which is available since Central Server® 4.3. Robots of type
Shared ![]() can be used with both web applications.
can be used with both web applications.
To perform this operation, standard users must own the
privilege Robots Administration .
Robot Restart
User/System User
To enable this menu item and perform a Robot's restart, at least
one Robot has to be selected. Clicking Restart opens a message box for Robot restart confirmation. The Robot
restart will be automatically scheduled as a task for the respective Robot; thus the restart process may take some time.
Users may view the task's state within the Robot Management's Tasks tab.
To perform this operation
standard users must own the privilege Robots Administration.
Robot Remove
User/System User
To enable this menu item and perform a Robot's removal, at least
one Robot has to be selected. Clicking Remove opens a message box for Robot removal confirmation. To perform this
operation standard users must own the privilege Robots Administration.
Robot Download Logfiles
User/System User
To enable this menu item and perform the download of Robot
logfiles, one single Robot has to be selected. Clicking Download Logfiles opens a message box for logfile
download confirmation. Please note, that the download of Robot logfiles may take several minutes. To perform this
operation standard users must own the privilege Robot Edit.
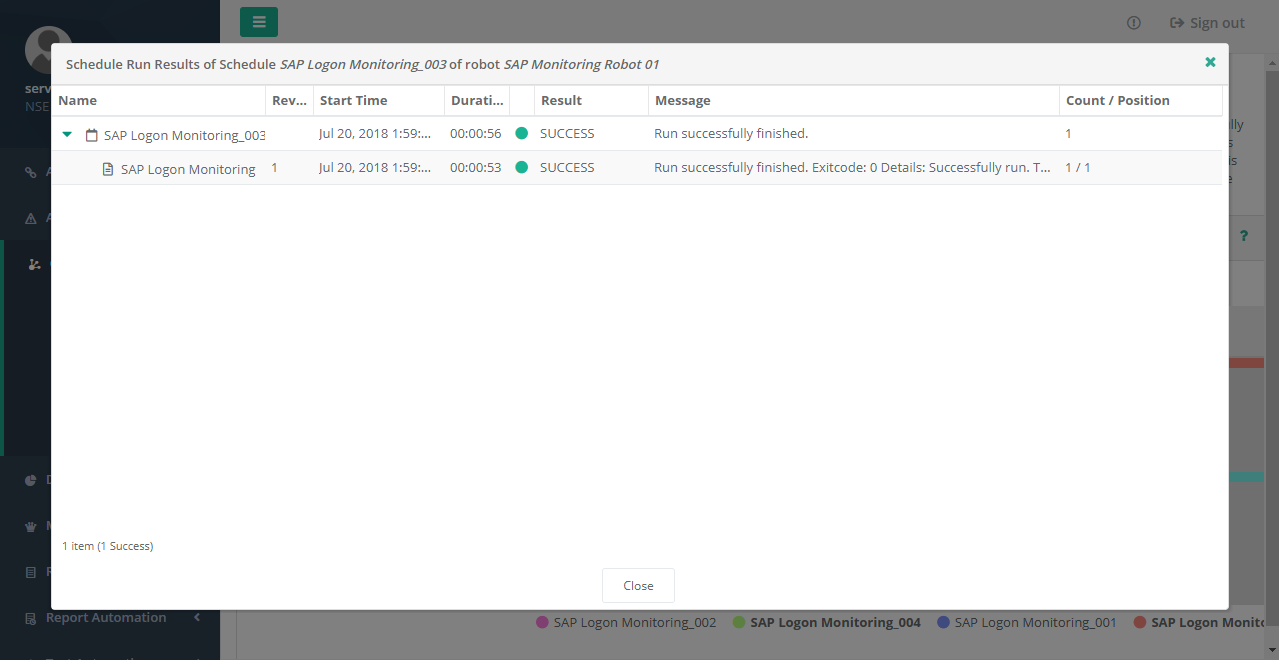
Analysis Schedule Run Results
User/System User
To enable this menu item and show the Schedule run result, one
single Robot has to be selected. Clicking Schedule Run Results opens a window showing the Schedule run results of
the selected Robot.
Analysis Schedule Run Results Timeline
User/System User
To enable this menu item and show the Schedule run result's
timeline, one single Robot has to be selected. Clicking Schedule Run Results Timeline opens another view showing
the Schedule run result's timeline.
Licensing Robot License
User/System User
To enable this menu item and manage Robot licenses, at least one
Robot has to be selected. Clicking Robot License opens a wizard guiding users through the process of granting
licenses to Robots.
To perform this operation, standard users must own the privilege Licenses
Edit.
Licensing Servicetrace® Secure Session License
User/System User
To enable this menu item and manage Servicetrace® Secure Session
licenses, at least one Robot has to be selected. Clicking Secure Session Licenses opens a wizard guiding
users through the process of granting Servicetrace® Secure Session licenses to Robots.
To perform this operation,
standard users must own the privilege Licenses Edit.
Licensing Robot Module License
User/System User
To enable this menu item and manage Robot Module Licenses, at
least one Robot has to be selected. Clicking Robot Module License opens a wizard guiding users through the
process of granting Workflow feature licenses to Robots.
To perform this operation, standard users must own the
privilege Licenses Edit.
Customer Transfer Robots
User
Standard users are not allowed to manage System resources, therefore the menu
item Transfer Robots is not visible for standard users.
System User
System Users may transfer System Robots to arbitrary Customers. These Robots must be
unlicensed. Such
transferred Robots turn into standard (Customer) Robots and disappear from the current System view. This menu item is only
shown in the System context and does not require a selected Robot.
- Schedule run results and tasks associated with the respective Robot will be removed.
- The System Robot turns into a Customer Robot and thus disappears from the System context's Robot list.
- An associated System Station will be released. All Stations with a different Customer than the destination Customer will be released as well.
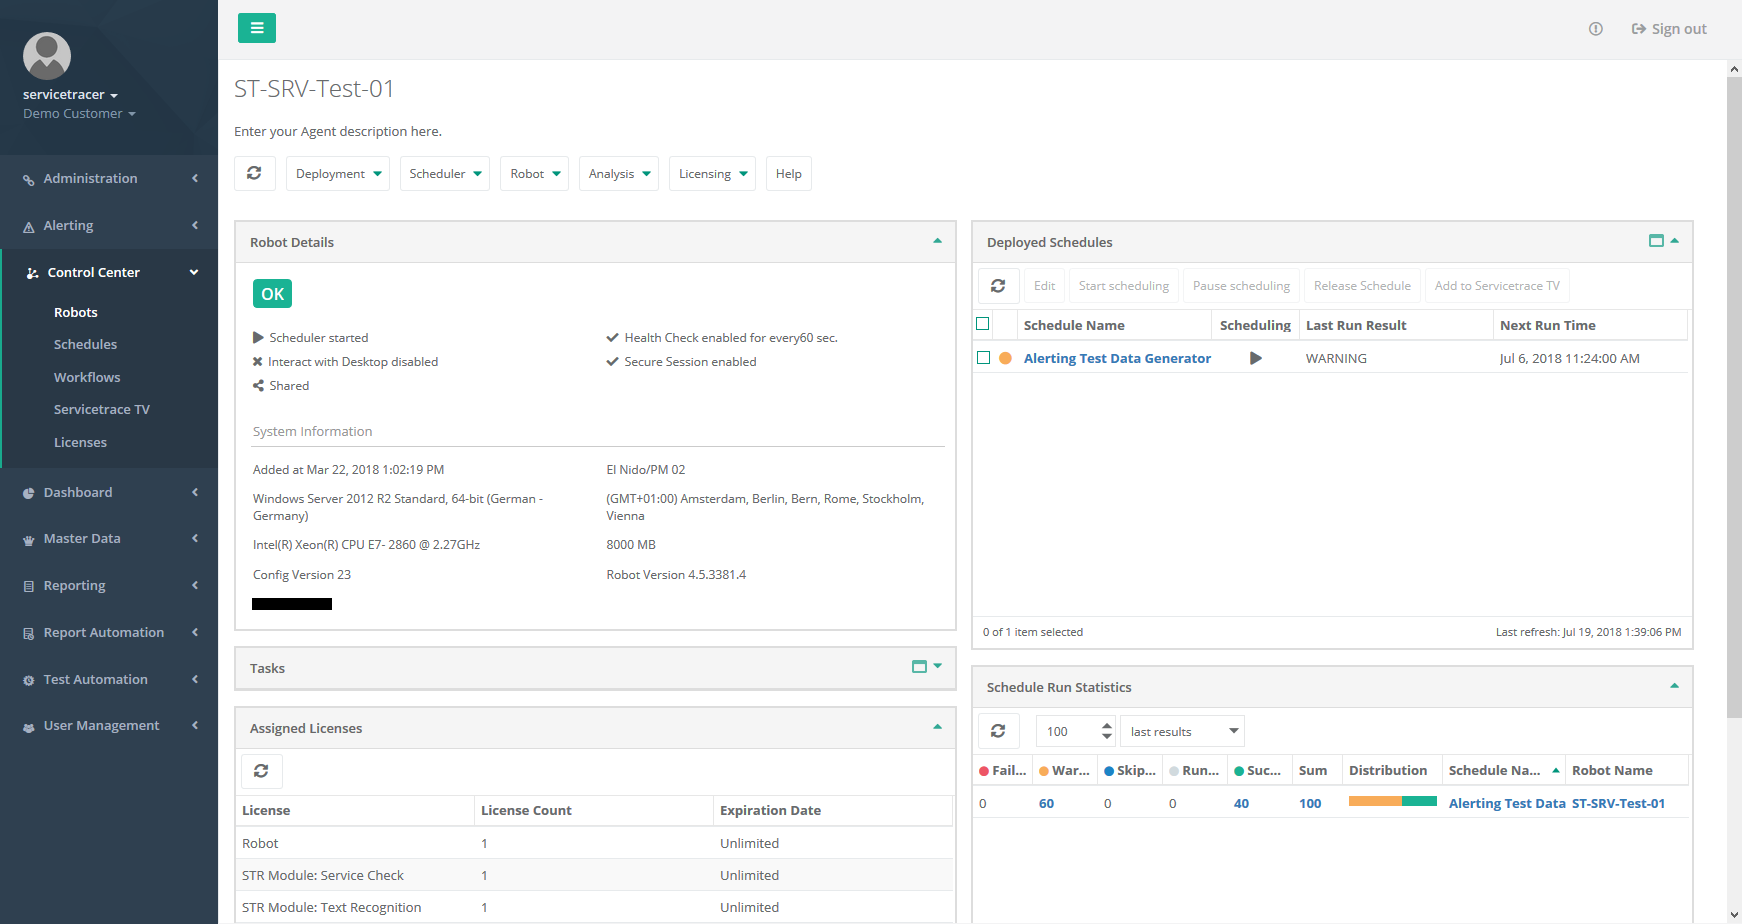
Deployed Schedules
The Deployed Schedules tab shows a list of Schedules assigned to Robots selected. Amongst other information, the list shows the Schedule's last execution and last run result. The column Next Run Time displays the next date/time the respective Schedule will be executed.

The Deployed Schedules list supports multi-selection. With the aid of the toolbar or the context menu users are able to start and pause a Schedule's scheduling and to release the selected Schedules from the respective Robots. Furthermore, users are able to add Schedules to Servicetrace® TV.
Menu
The tab supports the following menu.
Refresh
User/System User
This menu item is enabled, if at least one Robot is selected, and
is used to refresh the deployed Schedules list of the Robots selected. The table's status bar shows the time stamp of
the last refresh.
Edit
User/System User
To enable this menu item and perform the modification, one single
Schedule has to be selected. Clicking Edit opens a wizard guiding users through the process of modifying the
Schedule selected.
To perform this operation, standard users must own the privilege Schedules
Create / Edit. If the respective Schedule is already deployed to Robots, the user must own the
privilege Schedules Deploy as well.
Start Scheduling
User/System User
To enable this menu item and perform the start of the scheduling,
at least one deployed Schedule has to be selected. Please note the distinction between a Robot's Scheduler and the
scheduling of individual Schedules. Each Robot contains one Scheduler undertaking the processing of all Schedules.
Therefore, starting and stopping a Robot's Scheduler affects all Schedules. Starting an individual Schedule's
scheduling - as described by this menu item - affects selected Schedules only. Starting a Schedule will be automatically
scheduled as a task for the respective Robots; thus the starting process may take some time. Users may view the task's
state within the Robot Management's Tasks tab.
To perform this operation, standard users must own the
privilege Robot Edit.
Pause Scheduling
User/System User
To enable this menu item and perform the pausing of the
scheduling, at least one deployed Schedule has to be selected. Please note the distinction between a Robot's Scheduler
and the scheduling of individual Schedules. Each Robot contains one Scheduler undertaking the processing of all
Schedules. Therefore, starting and stopping a Robot's Scheduler affects all Schedules. Pausing an individual Schedule's
scheduling - as described by this menu item - affects selected Schedules only. Pausing a Schedule will be automatically
scheduled as a task for the respective Robots; thus the pausing process may take some time. Users may view the task's
state within the Robot Management's Tasks tab.
To perform this operation, standard users must own the
privilege Robot Edit.
Release Schedule
User/System User
To enable this menu item and perform the release, at least one
deployed Schedule has to be selected. Clicking Release Schedule opens a message box for Schedule release
confirmation.
To perform this operation a standard user must own the privilege Robot
Edit.
Add to Servicetrace TV
User/System User
To enable this menu item and perform the addition, at least one
deployed Schedule has to be selected. Clicking Add to Servicetrace TV opens a message box for confirmation.
After adding Schedules, the view switches to Servicetrace TV.
Schedule Run Statistics
The tab Schedule Run Statistics shows statistics of Schedule executions, if at least one Robot is selected. Within the selected time interval, users are able to analyze the execution results per Schedule with respect to the four states Failure, Warning, Skipped and Success. Besides the raw statistical data, a graphical distribution helps qualifying the results: failures are coloured red, warnings yellow, skipped executions blue and succeessful executions green. This tab supports the retrieval of four different lists of Schedule run statistics.
- Schedule run statistics of the last N hours.
Please note: a maximum time span of 72 h may be specified. Due to performance reasons, statistics are calculated up to a maximum of 100,000 results per Robot. This may lead to run statistics starting later than the specified N hours in the past.
- Schedule run statistics of the last N hours until the specified date and time. Time has to be
specified in 24 hour format (hh:mm:ss).
Please note: a maximum time span of 72 h may be specified. Due to performance reasons, statistics are calculated up to a maximum of 100,000 results per Robot. This may lead to run statistics that last until the specified date and time, but start later than the specified N hours in the past.
- The last N Schedule run statistics.
Please note: a maximum count N of 100,000 may be specified. The count N applies to each selected Robot - i.e. statistics are calculated across N results per Robot.
- The last N Schedule run statistics until the specified date and time. Time has to be specified in
24 hour format (hh:mm:ss).
Please note: a maximum count N of 100,000 may be specified. The count N applies to each selected Robot - i.e. statistics are calculated across N results per Robot.
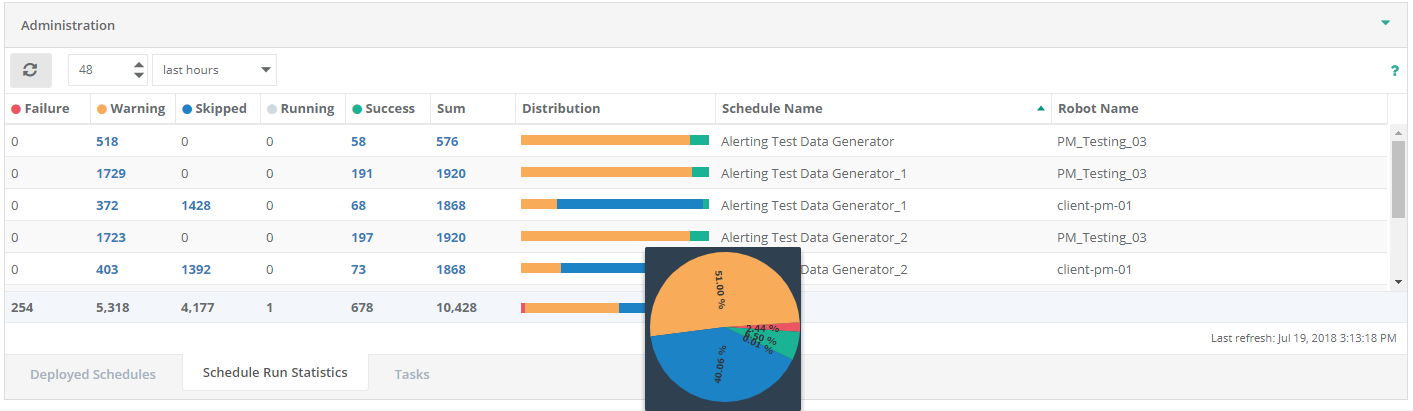
The last aggregation row shows the sum of values in the respective column. Besides the graphical distribution, users may view the percentage distribution of Schedule run statistics as a pie chart by hovering over the respective cell within the Distribution column.
To facilitate analysis of Schedule executions, the tab supports different kinds of drill-downs. Drill-downs are shown in an overlay window, displaying detailed Schedule and Workflow run results filtered with respect to the selected drill-down. The results are shown in a special tree view, thus the Workflow run results of each Schedule execution may be analyzed as well.
To reflect the statistics selected, the drill-down changes the time interval as follows:
| Schedule Run Statistics Time Interval | Drill-Down Time Interval |
| Last hours | Last N results until the last update of the Schedule run statistics. N is the count of the respective result status. |
| Last N results | |
| Last hours until | Last N results until the date/time specified in the Schedule run statistics. N is the count of the respective result status. |
| Last N results until |
For example, the following screenshot shows the last N run results of a result status drill-down.
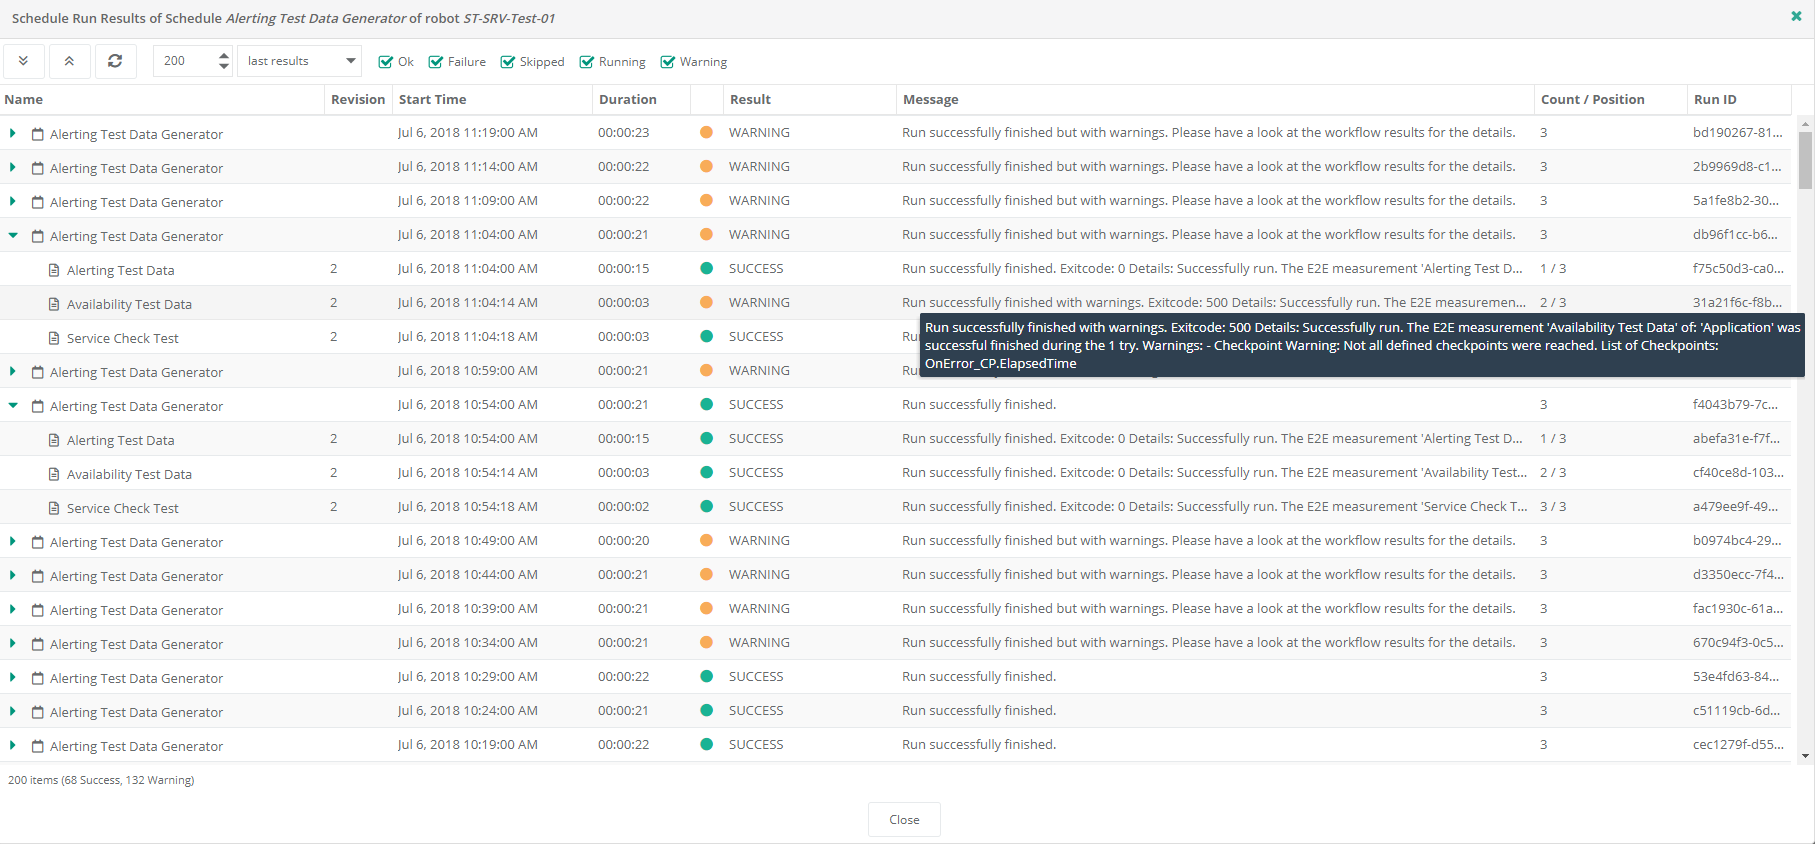
The drill-down supports the retrieval of four different lists of Schedule run results. Please note that the drill-down view is limited to a number smaller than the number of results within the statistics. Thus the drill-down may not contain all results of the selected entity.
- Schedule run results of the last N hours.
Please note: a maximum time span of 72 h may be specified. Due to performance reasons, the maximum number of results per Robot is limited to 2,000. This may lead to run results starting later than the specified N hours in the past.
- Schedule run results of the last N hours until the specified date and time. The time has to be
provided in 24 hour format (hh:mm:ss).
Please note: a maximum time span of 72 h may be specified. Due to performance reasons, only a maximum of 2,000 results per Robot are permitted. This may lead to run results that last until the specified date and time, but start later than the specified N hours in the past.
- Last N Schedule run results.
Please note: a maximum count N of 2,000 may be specified. The count N applies to each selected Robot - i.e. N results per Robot are calculated.
- Last N Schedule run results until the specified date and time. Time has to be specified in 24 hour
format (hh:mm:ss).
Please note: a maximum count N of 2,000 may be specified. The count N applies to each selected Robot - i.e. N results per Robot are calculated.
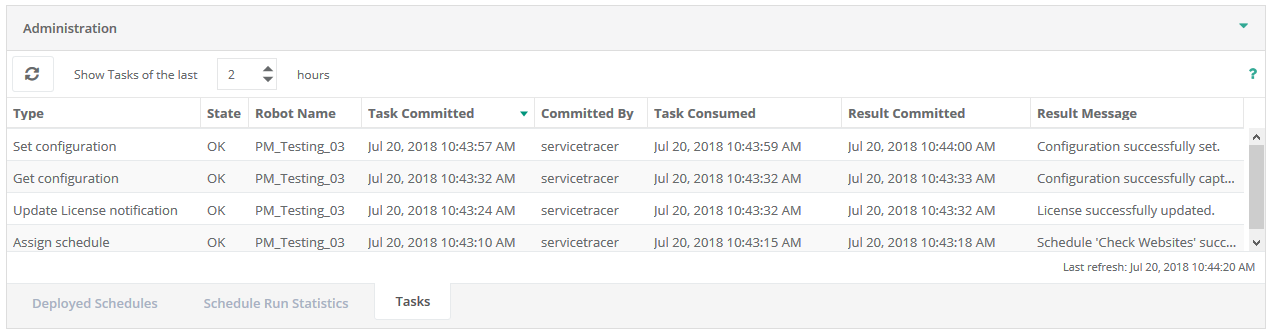
Tasks
The tab Tasks shows all tasks of the Robots selected. Several operations within the Control Center are performed asynchronously - i.e. the Control Center creates a task which the respective Robot has to process. This tab shows a list of such tasks. Among other properties, a task has a type, a state and a result. If an operation is performed asynchronously, the web Client shows a message box. In this case, users will find the respective task within this tab and may analyse the state of the corresponding operation. Within the toolbar, users may specify the time interval of interest.
Menu
The tab Tasks supports the following menu.
Refresh
User/System User
This menu item is enabled, if at least one Robot is selected, and
is used to refresh the task lists for the Robots selected. The list shows the tasks for the time interval specified. The
table's status bar shows the time stamp of the last refresh.
Robot Configuration
The Robot configuration is performed within a separate view. Initially, this view shows the current configuration of the selected Robot, which users are able to modify and afterwards deploy the modified configuration to several selected Robots at once.
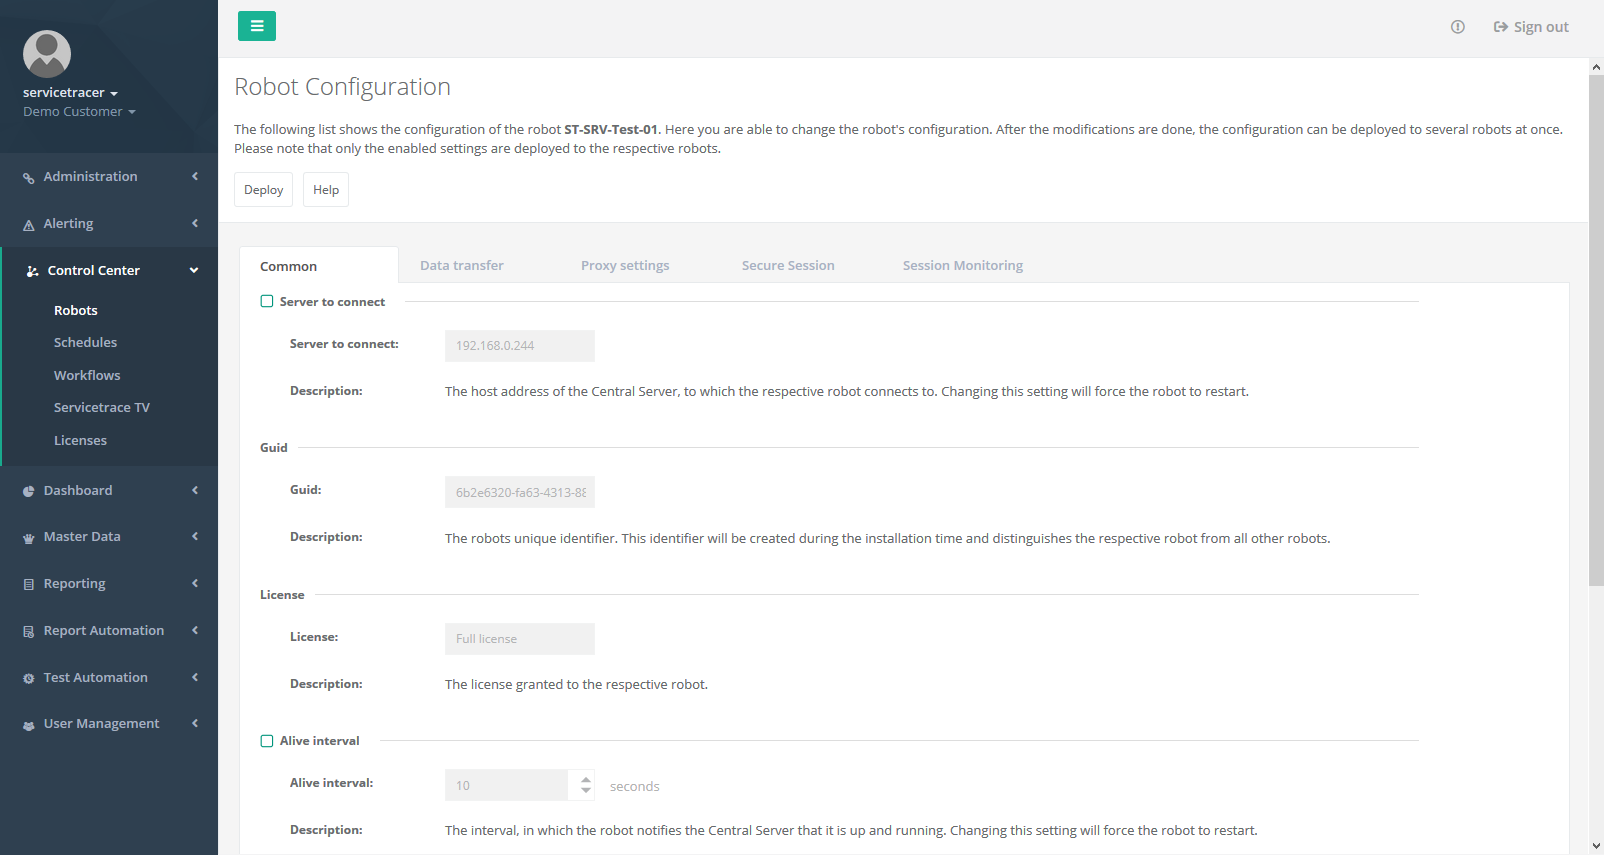
The Robot properties are sorted in several categories like Common, Data transfer etc. Each category contains several Robot properties like Server to connect, Guid, License etc. Some of these properties are read-only and thus cannot be modified by users. All Robot properties are disabled by default. Clicking the checkbox next to the property name enables modification.
After modifying Robot properties, clicking Deploy opens a self-explanatory wizard guiding users through the Robot configuration. The Robot configuration will be automatically scheduled as a task for the respective Robot; thus the configuration process may take some time. Users may view the task's state within the Robot Management's Tasks tab.
Menu
The Robot configuration supports the following menu.
Schedule Run Results Timeline
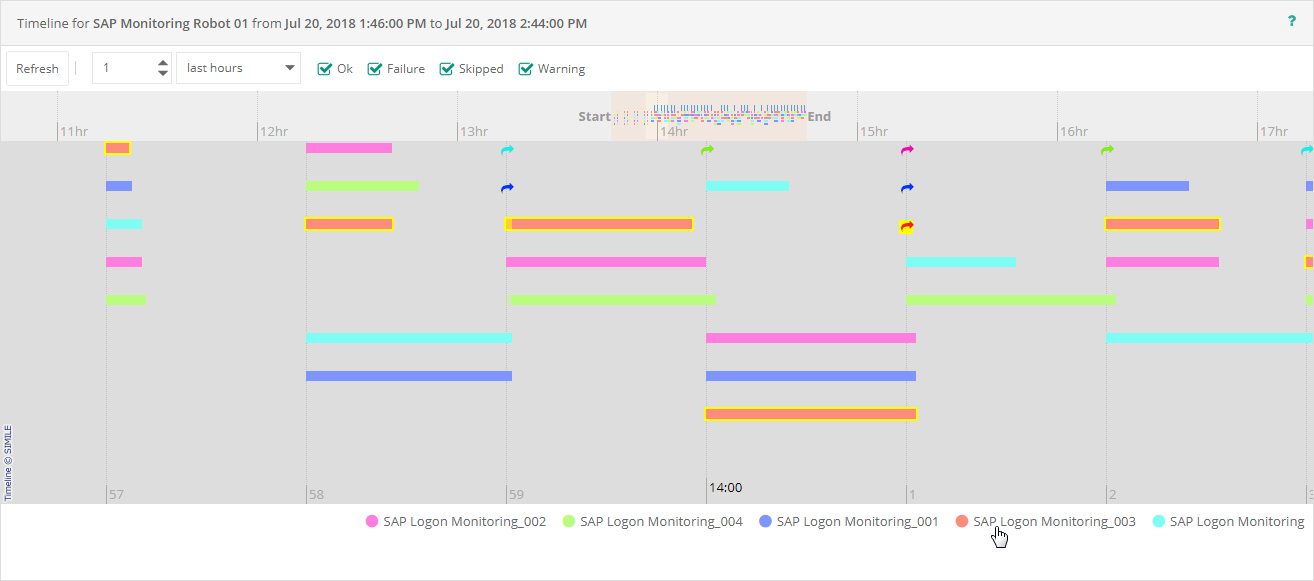
The Schedule run results timeline shows the execution results of all Schedules deployed to a specified Robot. By means of this timeline, users are able to analyse each Schedule execution with respect to its duration, result and distribution over Servicetrace® Secure Sessions. The screenshot below shows the timeline in action.
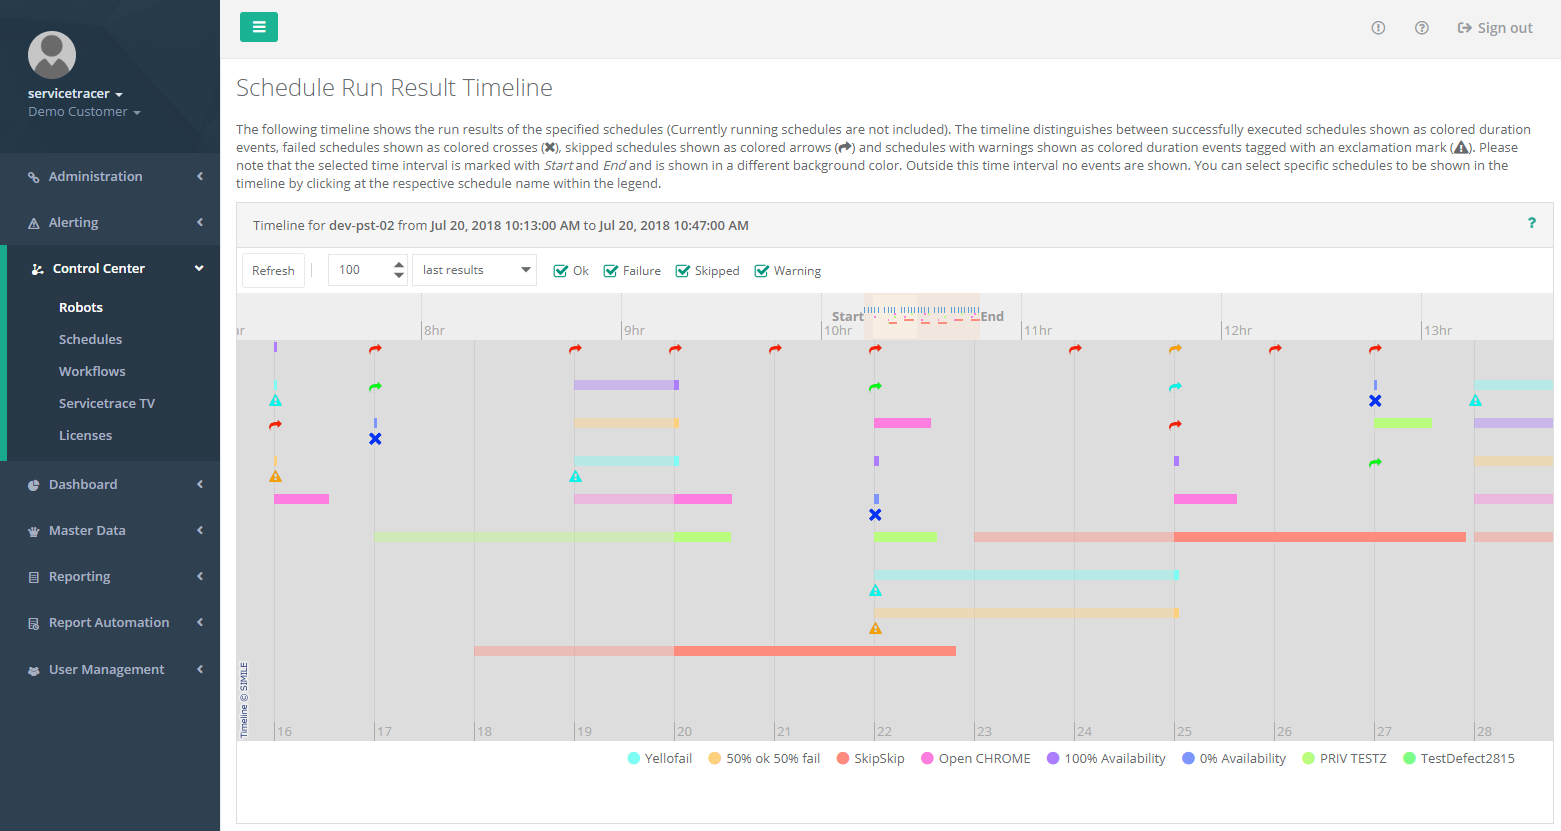
The timeline shows the Schedule run results within a specified time interval. This interval is displayed in the timeline's title; moreover it is marked with "Start" and "End" as well as with a special background colour within the timeline. Outside this time interval no run results are shown. The time interval for Schedule run results may be configured as described below.
- Schedule run results of the last N hours.
Please note: a maximum time span of 72 h may be specified. Due to performance reasons, the maximum number of results per Robot is limited to 2,000. This may lead to run results starting later than the specified N hours in the past.
- Schedule run results of the last N hours until date and time specified. Time has to be specified
in 24 hour format (hh:mm:ss).
Please note: a maximum time span of 72 h may be specified. Due to performance reasons, the maximum number of results per Robot is limited to 2,000. This may lead to run results that last until the specified date and time, but start later than the specified N hours in the past.
- Last N Schedule run results.
Please note: a maximum count N of 2,000 may be specified. The count N applies to each selected Robot - i.e. N results per Robot are determined.
- Last N Schedule run results until date and time specified. The time has to be provided in 24 hour
format (hh:mm:ss).
Please note: a maximum count N of 2,000 may be specified. The count N applies to each selected Robot - i.e. N results per Robot are determined.
The timeline consists of several bands. Each band has a different resolution in time. According to the length of the specified time interval the timeline is build-up of two or three bands: one or two overview bands and one detailed band. Each band can be moved in time by horizontal dragging, overview bands can be moved in time by using the mouse-wheel as well. Depending on the band's time resolution the movement is slower or faster. Within the detailed band, the mouse-wheel changes the time resolution.
The detailed band distinguishes between different run results:
Coloured Bar
A coloured bar represents a succeessful Schedule run. The
length of the bar represents the duration of the Schedule's run. Hovering the bar shows a tooltip containing a summary
of the respective execution. Moreover, left-clicking the bar opens a drill-down in an overlay window which contains
detailed information about the Schedule run, including details about the encapsulated Workflow runs as well.
The transparent initialization of a coloured bar denotes the initialization of the respective Schedule. Among others, the initialization may contain the download of the encapsulated Workflows and the configuration of a Secure Session Caution: If many Schedule executions start with a long initialization phase, the Schedules use different settings and the respective Robot may have an insufficient number of Servicetrace® Secure Sessions installed.
Coloured Cross
A coloured cross represents a failed Schedule run.
Left-clicking the cross opens a detailed view of the failed Schedule execution in an overlay window, containing detailed
information about the Schedule run as well as the encapsulated Workflow runs.
Coloured Arrow
A coloured arrow represents a skipped Schedule run.
Left-clicking the arrow opens a detailed view of the skipped Schedule execution in an overlay window, containing
detailed information about the Schedule run as well as the encapsulated Workflow runs.
Coloured Bar tagged with a Cross
A coloured bar tagged with a cross
represents a Schedule run that failed as a whole, whereas some of the contained Workflows were executed at least
partially. The length of the bar represents the duration of the Schedule's run. Hovering the bar shows a tooltip
containing a summary of the respective execution. Moreover, left-clicking the bar opens a drill-down in an overlay
window which contains detailed information about the Schedule run, including details about the encapsulated Workflow
runs as well.
Coloured Bar tagged with an Exclamation Mark
A coloured bar tagged with
an exclamation mark represents a Schedule run containing warnings. The length of the bar represents the duration of the
Schedule's run. Moreover, left-clicking the bar opens a drill-down in an overlay window which contains detailed
information about the Schedule run, including details about the encapsulated Workflow runs as well.
As mentioned above, the timeline supports hovering. Hovering the coloured bars opens tooltips containing following information: Schedule name, Schedule start time and duration, duration of the first five Workflows and a bar representing the relative executions of the encapsulated Workflows (including the Schedule's initialization). The bars may show following colours:
Grey
A grey segment at the beginning of a bar represents the relative
duration of the Schedule's initialization. Among others, the initialization may contain the download of the encapsulated
Workflows and the configuration of a Servicetrace® Secure Session.
Green
A green bar represents the relative duration of a succeessful
Workflow.
Red
A red bar represents the relative duration of a failed Workflow. If
the respective Workflow has not been started (i.e. its run duration is zero) a small red bar is shown to indicate the
failed Workflow.
Blue
A small blue bar indicates a skipped Workflow.

Left-clicking a bar within the timeline opens a drill-down in a separate overlay window, providing detailed information about the respective Schedule run for analysing purposes.
Please note
A Schedule's duration is more than the sum of the contained Workflow durations. It contains the
Schedule's initialization as well. Among others, a Schedule initialization may contain the download of the encapsulated
Workflows and the configuration of a Servicetrace® Secure Session. Thus the Schedule duration may be higher than the sum
of
the respective Workflow durations.
Besides moving in time, the timeline supports filtering of Schedules. Left-clicking a Schedule's name in the legend below the timeline adds or removes Schedules from filtering. Only selected / filtered Schedules will be shown in the timeline's detailed band and appear in bold format in the legend below; whereas Schedules excluded from filtering are not shown in the timeline's detailed band and appear in standard format in the legend below. If filtering is set active, the legend contains a special item called "[Reset Filter]", allowing the reset of all filters at once. If all Schedules are removed from the filter, the timeline shows all Schedules again and all Schedule names appear in standard format in the legend below. Please note that the filter applies to the timeline's detailed band only.
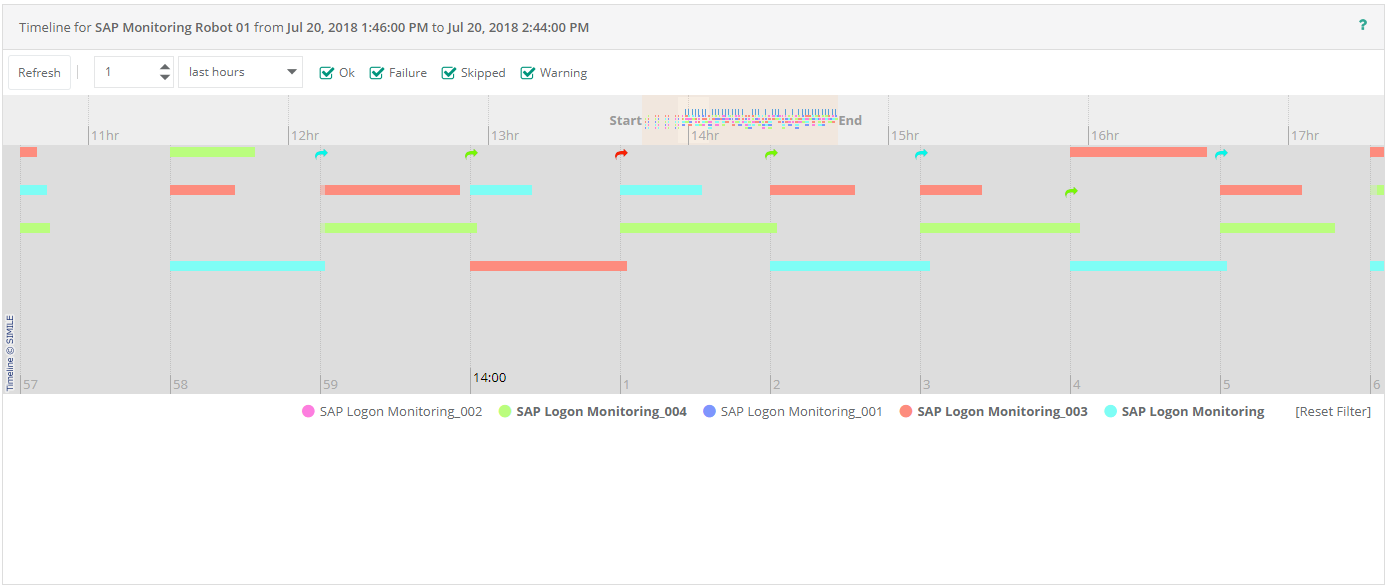
Another way to focus on a specific Schedule is highlighting. In contrast to filtering, highlighting does not hide Schedule run results, but highlights selected Schedules with a yellow background colour. Hovering a Schedule's name in the timeline's legend highlights the Schedule in the timeline.
Detailed View
This view shows details of a Robot selected. Left-clicking an Robot name within the list of Robots opens its detailed view. Selectable Robot names are highlighted when hovered. The properties shown within the detailed view depend on the logged in user's type (System User or standard user). Moreover, the properties shown to System Users depend on the Customer currently selected by Customer Switch.
In the left section of the detailed view a quick-selection Robots menu allows users to select another Robot. The list of Robot names can be reduced / filtered by means of the text field.
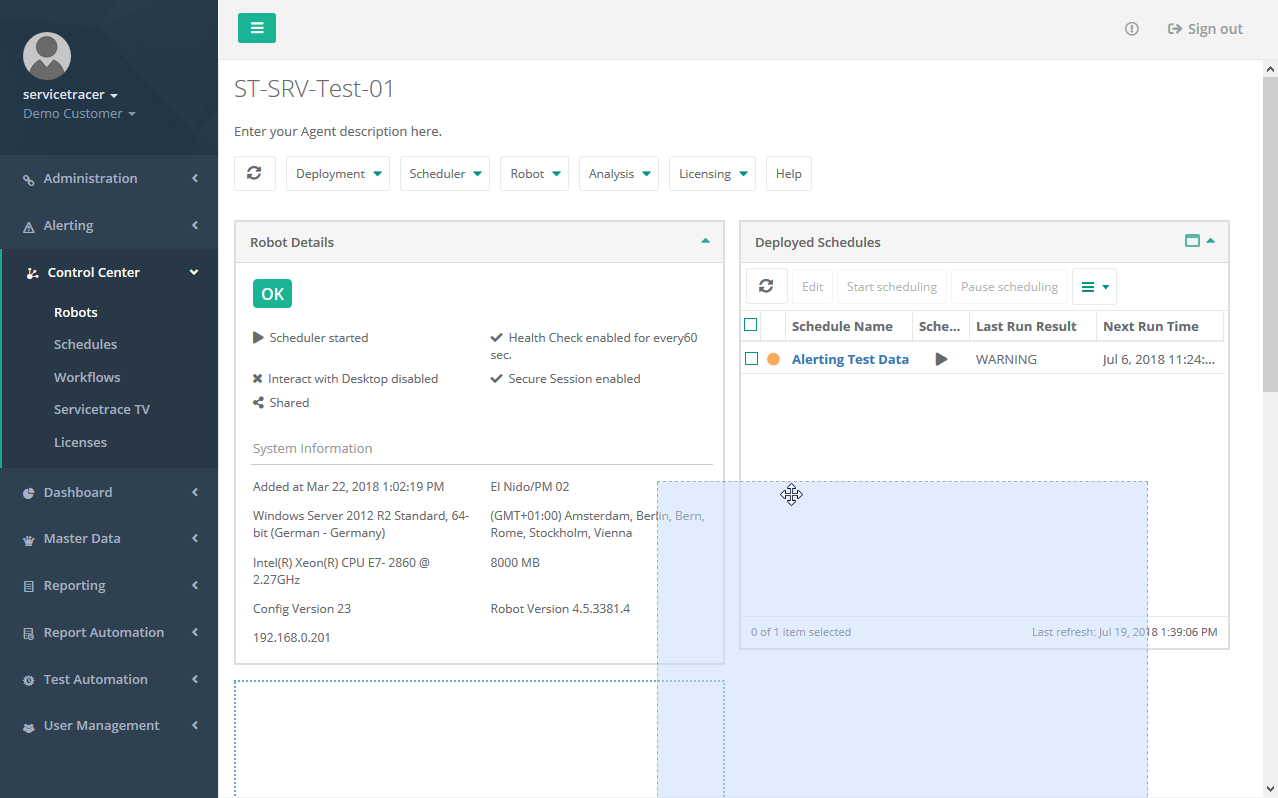
Besides the Robot's Details (host name, version, time zone, etc.) the detailed view contains three additional Robot relying views: Deployed Schedules, Tasks and Schedule Run Statistics.
The detailed view is implemented as a portal - i.e. the small windows (also called portlets) may be rearranged by drag & drop as required. Clicking the small arrow in the right upper section minimizes the portlets.
The logged in user's type and, in case of a System User, the currently selected Customer determine the detailed view's content. This is true for the menu as well. Please refer above for a detailed description of each menu item.